
How to maintain high viability in stored yeast

Congrats! You have successfully harvested yeast into your brink. Now we will outline the best practices for feeding and storing your yeast to ensure the highest possible viability.
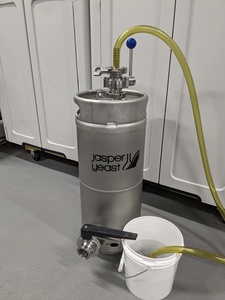
Picture A. represents a yeast brink properly stored in your walkin cooler. The TC fitting at the top of the keg, with the attached hose will allow the yeast to off-gas in the event any CO2 is released during storage. Often yeast is harvested under pressure to increase the volume in the brink. This yeast should have a way to vent and avoid high levels of head pressure, which will lower the viability of the yeast in storage. Place the brink away from the door, in the coldest area to avoid warm spots when brewers are working with the door open during the day. Liquid yeast viability drops as temperatures rise. If your walk-in cannot maintain a 36F average temperature, consider placing your yeast brink in a large bucket filled with ice to achieve the coldest temperature possible, just above freezing.
Ideally you'll only store your yeast for one week or less. If a situation arises where you'll need more storage time until your next brew, you should feed the yeast once per week. If you're brewing once a week, you have an opportunity to feed every yeast in storage at your brewery.
We ship a concentrated, sterile bottle of media with every yeast shipment. We have outlined how you can make your own autoclaved yeast feeder in the blog post, DIY Yeast Feeders. This is by far the safest way to feed yeast in storage. If you're not able to use a pressure cooker or small autoclave, use these instructions instead.
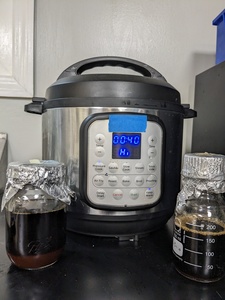
1. Carfully pull one liter, or more, directly from the boil kettle after approximately 30 minutes into your boil time, and pour directly into a cleaned, sanitized container. Three piece ball jars will work in a pinch, but Pyrex glassware with a screw cap is preferred. At this point in DIY Yeast Feeders, you would immediately place this container of wort into an autoclave or pressure cooker for at least 30 minutes. For this tutorial, you'll put the lid back on and place this container in your walk in cooler to chill. We recommend pulling samples directly from your kettle instead of further downstream to avoid any potential contamination from your heat exchanger.
2. Once completely cooled, (this could take more than one hour) you'll add this volume of boiled wort directly into your yeast brink. Spray the threads of the chilled wort container with isoproyl alcohol, then do the same with the clamp, gaskets, and lid of the yeast brink.
3. Carefully pour the wort into the yeast brink, then sanitize the lid and gasket with isopropyl again and reattach the lid. Ideal dosing rate is approximately 300mL of 15P wort for every 4liters of yeast slurry. If you filled a five gallon yeast brink half full with yeast slurry, you would need about 1liter of wort for proper feeding.
4. You must now do your best to resuspend the yeast in the brink as best as possible to properly mix the wort in the brink. Close the top butterfly valve on the brink and rock the brink back and forth to mix the yeast. This is not easy, as yeast will form a dense cake when in storage. We recommend setting a timer as a reminder to agitate the brink every 15 minutes. Slowly reopen the brink to allow the yeast to release any gas produced while in storage. Repeat these steps every 7-10 days and adjust the feeder volume based on yeast slurry harvested.
Ideally you'll only store your yeast for one week or less. If a situation arises where you'll need more storage time until your next brew, you should feed the yeast once per week. If you're brewing once a week, you have an opportunity to feed every yeast in storage at your brewery.
We ship a concentrated, sterile bottle of media with every yeast shipment. We have outlined how you can make your own autoclaved yeast feeder in the blog post, DIY Yeast Feeders. This is by far the safest way to feed yeast in storage. If you're not able to use a pressure cooker or small autoclave, use these instructions instead.
1. Carfully pull one liter, or more, directly from the boil kettle after approximately 30 minutes into your boil time, and pour directly into a cleaned, sanitized container. Three piece ball jars will work in a pinch, but Pyrex glassware with a screw cap is preferred. At this point in DIY Yeast Feeders, you would immediately place this container of wort into an autoclave or pressure cooker for at least 30 minutes. For this tutorial, you'll put the lid back on and place this container in your walk in cooler to chill. We recommend pulling samples directly from your kettle instead of further downstream to avoid any potential contamination from your heat exchanger.
2. Once completely cooled, (this could take more than one hour) you'll add this volume of boiled wort directly into your yeast brink. Spray the threads of the chilled wort container with isoproyl alcohol, then do the same with the clamp, gaskets, and lid of the yeast brink.
3. Carefully pour the wort into the yeast brink, then sanitize the lid and gasket with isopropyl again and reattach the lid. Ideal dosing rate is approximately 300mL of 15P wort for every 4liters of yeast slurry. If you filled a five gallon yeast brink half full with yeast slurry, you would need about 1liter of wort for proper feeding.
4. You must now do your best to resuspend the yeast in the brink as best as possible to properly mix the wort in the brink. Close the top butterfly valve on the brink and rock the brink back and forth to mix the yeast. This is not easy, as yeast will form a dense cake when in storage. We recommend setting a timer as a reminder to agitate the brink every 15 minutes. Slowly reopen the brink to allow the yeast to release any gas produced while in storage. Repeat these steps every 7-10 days and adjust the feeder volume based on yeast slurry harvested.

Stay in the know
Sign up for our newsletter now and hop into the world of brewing excellence.
Related Posts
How to maintain high viability in stored yeast
2023-07-05 22:33:56 UTC
By: Travis Tedrow
Congrats! You have successfully harvested yeast into your brink. Now we will outline the best practices for feeding and storing your yeast to ensure the highest possible viability.
How to DIY your own Yeast Feeders
2023-08-08 04:17:11 UTC
By: Jasper Akerboom
We ship a small bottle of autoclaved media to feed yeast pitch for every order. Below we'll detail how you can make your own yeast feeders with wort from your kettle.